Monday, September 28, 2015

Building Bridges, Part 1


In a previous post,  I mulled over what kind of bridges I was going to make. It must be due to the lunar eclipse,  because  I seemed to have had the time in the evenings this weekend to work.  So I started on a bridge.

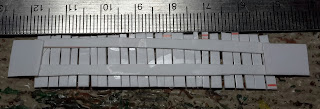
I decided to build a simple suspension bridge as a test run. After measuring the width of the river, I cut some styrene strips for planks and glued them to two long strips that run about the width of the river.
Top side of bridge.

Underneath the bridge.
I added a tab at either end of the bridge to hold it to the bank. I wasn't picky about the widths of the planks. This is supposed to be a crude bridge. 

Here is what it looks like resting on a section of river:
 

As you can see the planks extend onto the banks. I did this deliberately. In my previous post,  I felt that having a free standing bridge that I could put anywhere was the way to go, so I wanted some leaway to account for river width variation. Well, after about an hour of staring at it, I decided that there was no way for this to work as a free standing bridge. So, I started to build a narrow river section to go with it. 

I will pick this up in my next post.

Monday, September 21, 2015

The new Future is Pledge

This post is to share my hobby-geek joy with you all. I am close to running out the original Future Floor Finish. I've been using it since the late 90s, mixing it with black acrylic paint or India ink for a wash. I've tried a whole bunch of brands of pre-made washes, but none compare to using Future Floor Finish. What I like about it is that you can control the ratio of paint (or ink) to floor finish.

For reasons I don't understand, the S. C. Johnson company re-branded Future as Pledge Floor Care Finish. I cannot find this anywhere I live! Fortunately, Amazon.com sells it. It wasn't really all that expensive to order it online. This new bottle should last me quite awhile. I've heard all kinds of rumors that isn't as good as the original stuff...I guess I will find out. Word of warning: they make a similar product, but it has a detergent in it.

 This is stuff is pure liquid acrylic love! 

Friday, September 18, 2015

Bridge Dilemma

Now that I've made what I feel are enough river sections, the next step is to make (or buy) some bridges. Thinking about it, I can go two ways:

1. I can build or buy a bridge model that can be plunked down anywhere along the river segments.

2. I can make a small river segment, like I did for the river forge, that incorporates a bridge.

There are pros and cons to both.

Free standing bridge:
Pros: putting it anywhere means that a road can cross the river at any point. I don't have to force the road to fit a location along the river. Second, I can make various bridges to fit various games: European-looking bridges for WW2 or fantasy games; more generic or jungle-looking bridges for my fictional Gambusia campaign.
Cons: Won't look very pretty. Second, I will have to make sure that a bridge will span any point along a river. There may be the problem that a bridge is much longer than the width of the river section. That is more of an aesthetic issue, but a bridge that is too short will just look stupid. Also, if the banks are irregular in height (which they are to varying degrees) the bridge won't sit very well on it.

River segment with built-in bridge:
Pros: Will look much nicer. Will eliminate some of the problems listed in the above cons regarding free-standing bridges.
Cons: May be a big problem when there is a road crossing a river at a point where a bridge segment cannot be placed. I would have to force the road to conform to the river or reconfigure the river segments to conform to the road. Second, would take a little longer to build them. As much as I really enjoy building terrain, I'm getting a little burned out on it and want to finally do some gaming.

I have been combing the internet and both methods are used. I have noticed that the built-in bridges tend to be on tables that use terrain modules. I am not going in that direction. It might be that the free standing bridge is the way to go.

Any comments or suggestions are greatly welcomed.


Friday, September 4, 2015

Warp-free Rivers!

I recently bought a fancy label maker, so for about the last week I've been labeling my boxes of fantasy figures. That, and I finally completed my rivers.


I made them by cutting out the segments from sheet styrene  (for sale signs), then using caulk to make the river banks. Once the caulk dried, l painted the river with the appropriate colors. Yes, rivers are not really blue, but I gave up after several tries to get a more realistic color using greens and browns. The river was given two coats of gloss Mod Podge.

I have two widths.  The wider river segments I can also use for 15mm games. The bottom picture shows a short segment that is supposed to be a ford. It looks a little better than the photo....it look more like peanut brittle here! I am not happy with it, but it will do.

I will probably use painter's masking tape to hold them to the gaming table.

These turned out better than the ones using the foam core and took 1/3rd the time to make them.