Showing posts with label Terrain. Show all posts

Thursday, July 31, 2025

Cheap Game Table Mat Work in Progress

 As I mentioned in my previous post, I am switching gears after suffering painting burn out. It is time to actually play games rather than just paint hoards of figures. The few battles that I have had were on unnaturally colors tables. As cool as those neoprene, giant mouse pads are, they are way too expensive for me. I'd go with felt, but I found that the width dimensions are short and I am no good at sewing. I found these plastic backed table cloths at Walmart for about $5. They are textured but slick. I tested a spot with craft acrylic paint and it sticks and does not seem crack when gently folded.

I started with a big bottle of leaf green craft paint that I had from a previous attempt to make a mat. Unfortunately, I ran out before I was completely done with this one. Guess what? They don't make leaf green anymore. I got the closest thing I could find plus a darker green for a little variation. 

I'm using a wadded up paper towel to apply the paint and rubbing it on. I figured that if I use a brush the paint layer may be too thick and it might be subject to cracking. The paper towel seems to waste some paint but puts down a very thin layer that I go over again when dried. If the decorative pattern peaks through a little, its no big deal.

I'm almost done with it. When its finished, I will make another one in blue for naval games.

Painting in progress. Objects other than the
craft paint bottles holds the table cloth down while I paint.


Friday, July 19, 2024

15mm Watch Tower

 I've been working on this thing off and on for probably three years...mostly off. I took the advice of a crafter on YouTube to build it out of cardboard. I won't be doing that again. While very inexpensive, it was very time consuming and boring. I used a dollar store Christmas gift box as the base as it were. The battlement was made by gluing the lid to the main part of the box and then cutting out chunks to make the merlons and the crenels. The part that took forever was cutting out and gluing the stones to the sides of the walls. I used pulp paper egg cartons. They have a nice bumpy texture. I ran out of egg cartons and used regular cardboard for the outside and inside of the battlement wall. I should have made the floor of the battlement out of stone, but for some reason, I made it to look like wood planks. I used strips of card board. 

I sealed it all with a mixture of Mod Podge and black craft paint and then kept dry brushing it with lighter and lighter grays. For the wood, I painted it with a honey brown craft paint and then used made a wash of Future floor wax and burnt umber paint. 


I think it turned out OK. The stones are not to scale, but I don't really care. It isn't meant for diorama purposes. 

Recently, I bought a sheet of pink insulation foam. I plan to use that for my next terrain project. 

Tuesday, August 1, 2023

15mm Stone Walls

If you have followed past posts, I was spending a lot of time and effort to scratch build stone walls for 1/300 scale. Most of these attempts were less than satisfactory in my view. Having spend a lot of time recently painting up 15mm medieval and fantasy figures, and having made some 15mm structures in the past, I decided I wanted to make a few stone wall pieces at this figure size. 

If you watch any of the tutorials out there on making your own terrain, the number one building material is pink insulation foam. It the modeler's dream material. It can be cut, carved, and embossed. Buy a foam cutter and there is no limit on what you can do.  Unfortunately, pink foam is getting to be rather expensive. If I go to my local home improvement store (called DIY stores in other countries), I would have to buy it in large sheets that cost around $40 and that I don't think will fit in my minivan. In the USA, many of these stores will no longer cut a lot of building material because of potential toxic dusts and work safety concerns. Frankly, I don't really need 4'x8' sheets of the stuff.

What I used for my walls are the foam trays that are used as a sturdy base for packaging food items such as cuts of meat. One of the complaint that I heard about using this material is that it cannot be embossed.  I found that if you use a craft knife or single-edge razor blade, you can shave off a thin layer of the outer surface leaving a squishier surface that can be embossed. There is also different grades of this packing material and some seem to be closer in consistency to the pink insulation foam. The foam I used for my first wall section was more resistant to embossing even when I shaved it. Another foam tray (shown below) was more pliable.  Of course, its the luck of the draw what you end up getting. 

I cut strips of the foam of a more-or-less uniform width. I then embossed the stones with a ballpoint pen. Once embossed on both sides, I then glued them onto thin craft sticks that I bought for another project I'm working on. I rounded off the tops a best as I could using my craft knife and some light sanding. 


In addition to the long, straight sections, I also did some corner sections. I tried to make the ends of the wall sections as flush as I could, but they are not seamless continuations. 


For one of the long sections, I decided to have a gate. I built it out of pieces of styrene plastic. 


Once the glue dried, I sealed the walls with a mixture of Mod Podge, black, and burnt umber craft paint. When that was dried, I went over the stones with repeated dry brushes of gray. The base I painted brown and then flocked.


I was surprised that once I figured out the technique, I could quickly put out a number of walls. I think the whole project took about two nights to complete three long sections and two corner sections, and that was because I wanted to sealant to dry thoroughly. The gate was probably the most time consuming part of the project. Is it a high quality job? No. But it looks fine for the table top. 

Tuesday, July 12, 2022

Wooden Hexes

I ordered these about a month ago and am now just picking them up. 25mm hexes look a lot tiny-er than I envisioned, but they will do for my air combat games or ship battles with 1/6000 models. I will carefully glue them together and then mount them on some sort of board.

Friday, May 13, 2022

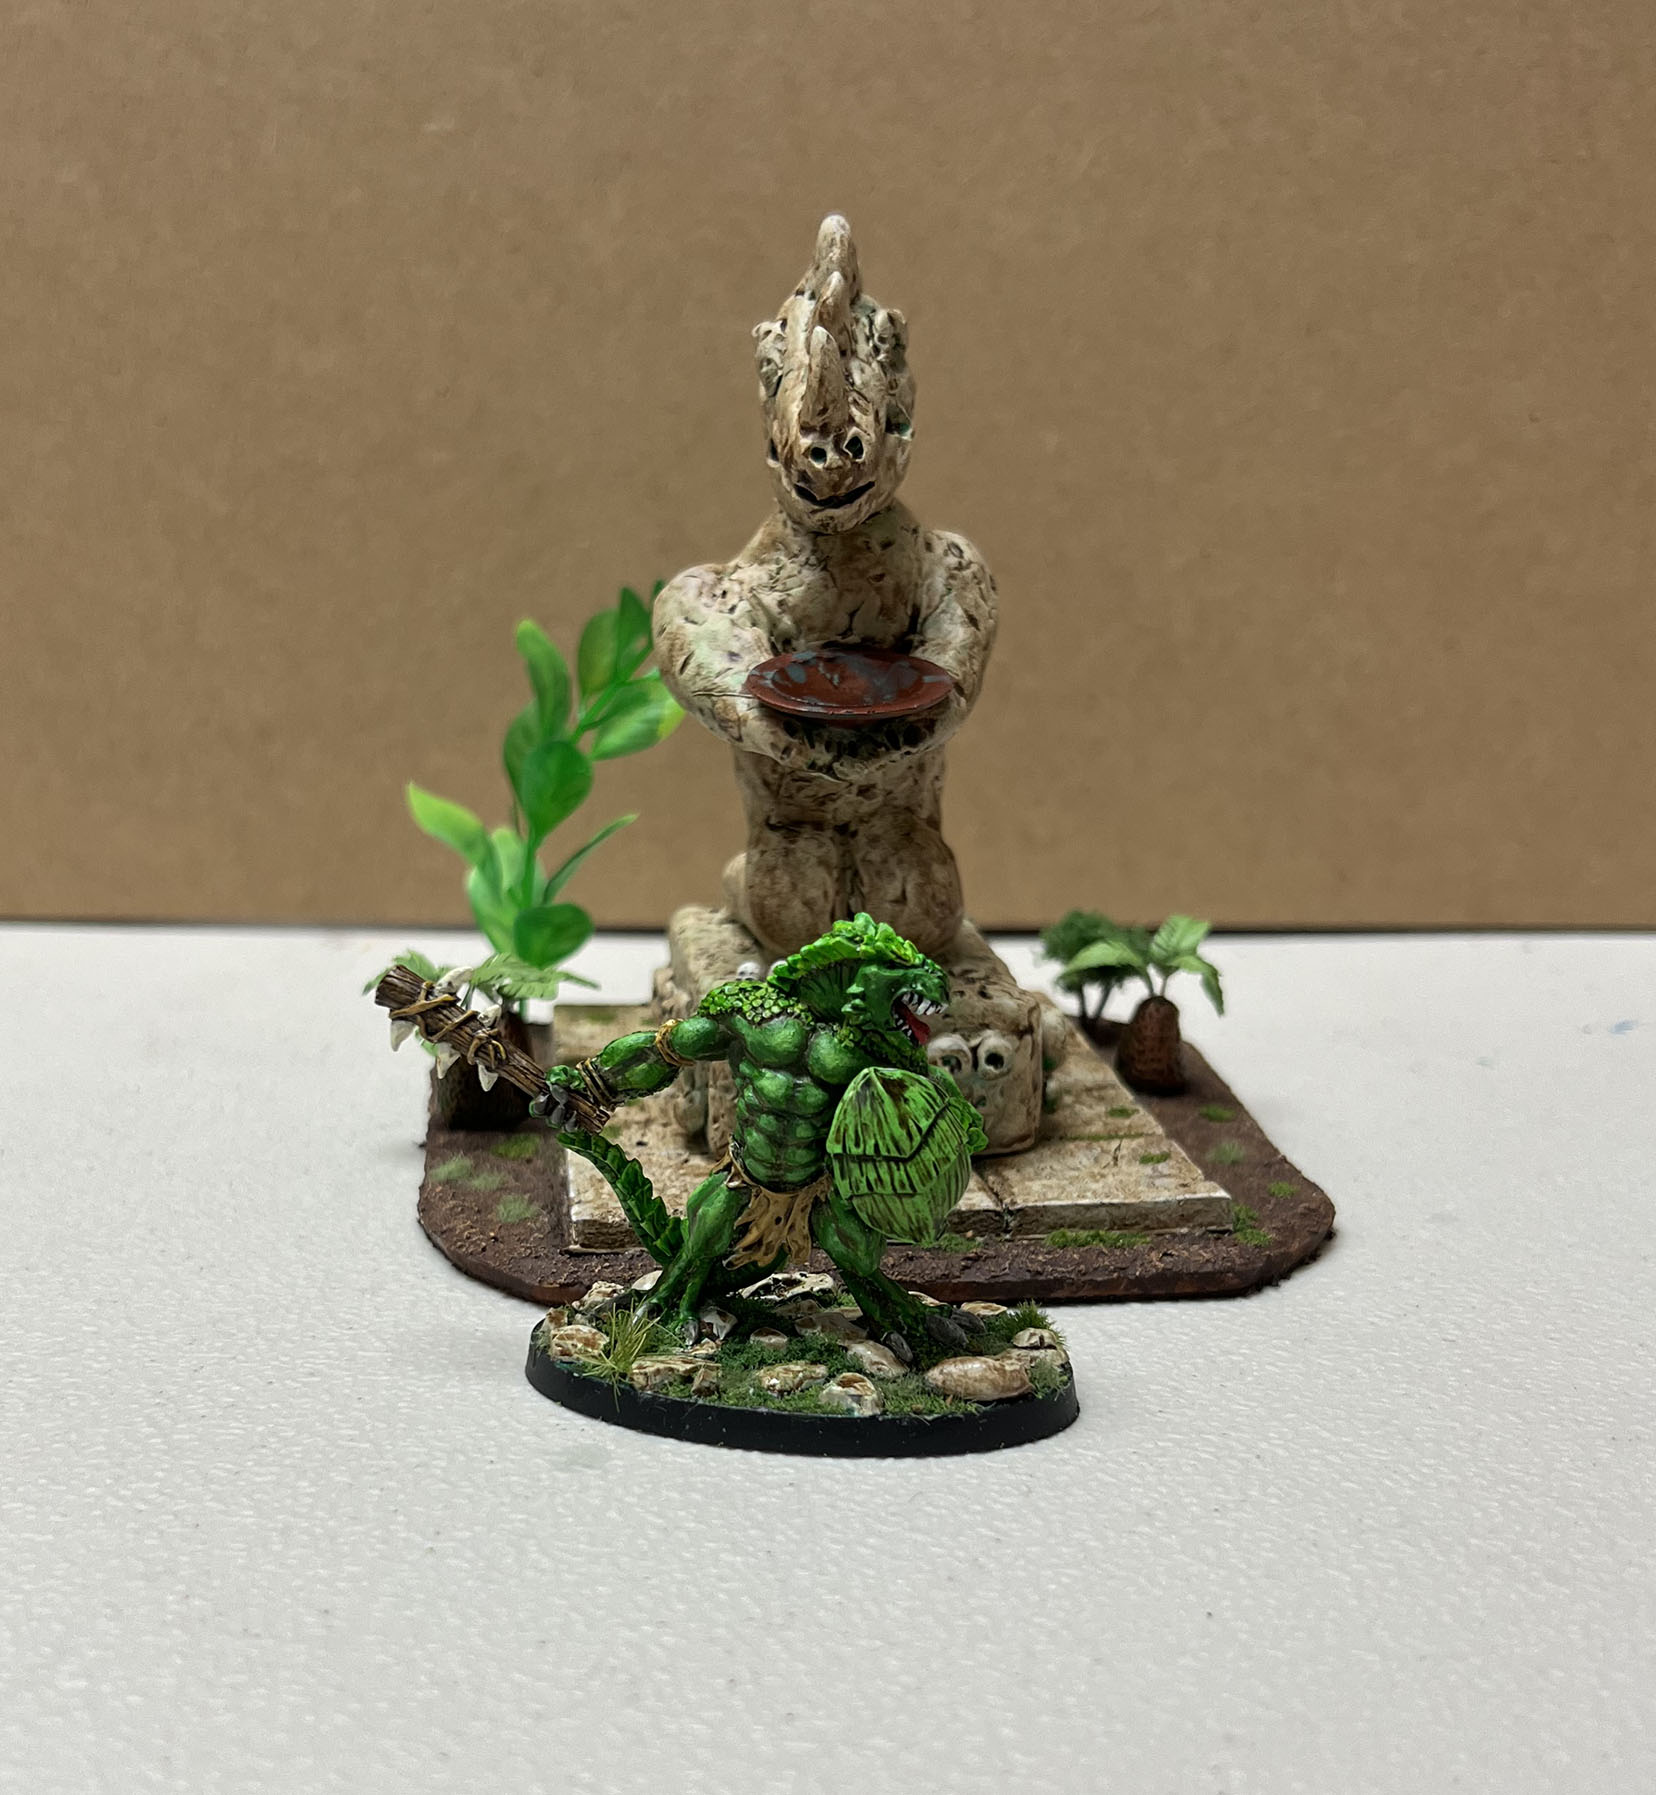
Fantasy Painting Challenge III: Lizardman part 4

 I finally got the statue of the lizard deity finished. Time to pack it all up and send to my friend. I had planned to make it much more "jungley" by putting a lot more plants around, but I didn't want to obscure some of the details on the sides of the base. Plus, I was starting to get burned out on making it and just wanted it finished.


I enjoyed making the statue and I learned a lot, but I think I need a break. It was very time consuming and as I said above, I was getting rather burned out. Hopefully for the next challenge, we will just stick to miniatures. 

Tuesday, April 26, 2022

Fantasy Painting Challenge III: Lizardman part 3

 I am moving along on my part of the challenge. I hope to be done this week. I leave Saturday or Sunday (weather permitting) for the beautiful state of Kansas and I won't be back until them following Saturday or Sunday (weather permitting). It's a road trip to visit some natural history museums and to hopefully visit some friends that are still out there. Renting a car is a LOT cheaper then flying and then renting a car. I hope the bean counters at my college appreciate this. Other than the weather, I am somewhat apprehensive about the drive. I used to do this sort of long distance thing (about 13 hours), but that was when I was young. Anyways, I want to wrap this project up and send it to my friend.


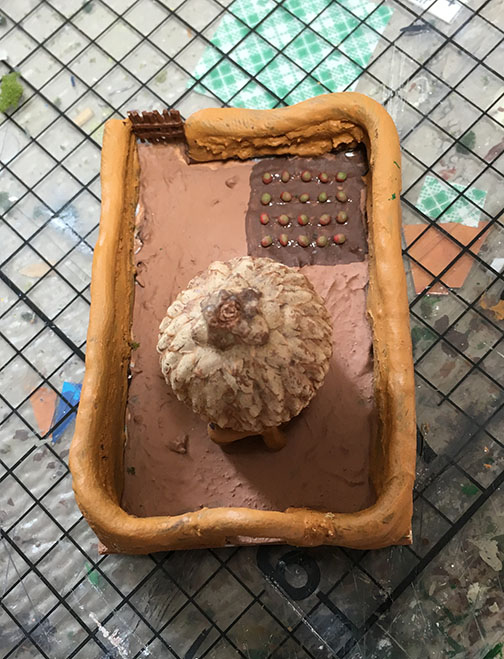
As I said in part 2, there needs to be some sort of scenic piece to go with the figurine. I decided on a statue of some Lizardman deity. My sculpting abilities are crap and it shows, but I figure that monumental sculpture is not a hallmark of Lizardman culture. 

Most of it is made of polymer clay that is slathered over the an aluminum foil armature for the statue and a block of wood for the pedestal. Most of the bas-relief lizard heads were also sculpted from polymer clay, but for a couple of them, I experimented with Green Stuff. The whole thing rests on some foam core board where I removed one side of the paper. That in turn sits on top of a base made of a scrap of vinyl flooring from our first, pre-flood floor. We have lots of that in our garage. With the except of the pedestal to the foam core, everything is glued to each other with E6000 glue. Its strong but it would have melted the foam board. As of right now, I am at the stage where I need to put some ground cover on the base, paint and then add some sort of foliage. Since this is the first time I'm making something like this, I am not going to make it overly ruin-like. I'm heading to Walmart today to pick up a prescription and might see if there are some cheap aquarium plants to use. We had some plants from an old aquarium but when I picked it up, they fell apart. 

Stay tuned for the final installment!

Sunday, January 9, 2022

First Post of the New Year: Proof of Concept

 I know its already January 9th, but Happy New Years!

I have to say that being on sabbatical has lowered my blood pressure some. There is still plenty of stress, but the idea of not teaching and even more so, not dealing with all the nonsense that is going on at my college, gives me a feeling of lightness. One of the things I've done is to start going to the local community center to work out. I am 60 year old, but I think I'm the youngest one there. The equipment is pretty good, so I plan to make working out more of a routine.

On to business....

First, in an effort to clean and organize the house, we moved some old bookshelves that we had on the first floor to the upstairs. My son got one, which is mainly for his LEGO collection. I got the other and finally consolidated all my hobby books into one bookshelf.  


New bookshelf. Almost, but not quite full.
My wife's tennis racket stringer to the right.

Why I didn't do this years ago escapes me. Before this, I had these very small metal ones that were OK, but I had long run out of room. Plus the sides were open and some of the rule books at the end facing the window were starting to yellow :(. This opens up a good deal of space in the "soldier room." The only thing now is to figure out what to do with some of the rule books that are in 3-ring binders. 

Painting of fantasy figures has slowed a bit, so I switched gears and have been working on some terrain features. Most of the terrain has been cultivated fields. I have been trying to make them so that I can use them for both 1/300 and for 1/600. One type of field that has frustrated me are corn fields. However, recently, I watched this YouTube video (https://www.youtube.com/channel/UC1cnHiqtsuMk9NwJNj8SmpA) where this guy was making tiny non-scale specific terrain mounted on hexes for his role playing games. In one video, he cut out strips of paper, folded it length-wise, feathered it using a pair of scissors, then mounted the feathered strip of paper onto a hex tile has a corn crop field. Anyway, I thought I'd give it a go. 

Closeup of corn field. Sorry about the blurriness.
I got a new phone and I'm trying to figure out the camera.

I used several different techniques and types of paper for each row. The ones on the far left were made using the YouTuber's technique of folding paper in half and cutting with scissors fringes representing stalks. The later ones were very thin cardboard (breakfast cereal boxes) and I used my Xacto knife rather than scissors to make the fringes. I did not go all the way to the bottom to keep some integrity to each row. I glued each strip down with superglue gel. They were painted a dark yellow and then I gave them a wash with brown. That helped pull out the stalks more. 

Here's what it looks like flipped around with some 1/600 figures next to it:


I think this will work pretty well for both scales. Its not perfect, but it gets the point across. I would have to come up with some other technique if I wanted to make a corn field for my 15mm figures. 

Wednesday, April 15, 2020

1/600 Buildings from China

Back in early January, I stumbled across a bunch of modelling supplies on AliExpress. AliExpress is an online shopping site in China that I guess is connected to Alibaba, though I am really not clear why or how they are different. They are both Chinese versions of Amazon.com, but everything comes directly from the manufacturer. Two other differences from Amazon.com are that they don't seem to sell books and it takes FOREVER for the stuff to get here. The first time I ordered from AliExpress, which was some dice, it took almost a year for them to ship. This time, it was about three months. And regarding what they sell, if you don't know, or are too young to remember, Amazon.com started off selling books before they got into everything else.
I had the fear in the back of my mind that the packages were dripping with Corona virus. I'm going to assume that they are not contaminated, or if there were any virus particles on them, they did not survive the trip. I sprayed everything with some disinfectant anyway.

I got these buildings. They didn't have a scale assigned to them, but the dimensions seemed like they were roughly 1/600. I ordered a few just to see what they looked like. I have yet to paint them. You be the judge.


These two appear to be small office buildings. They don't seem to have entry ways. The windows on the ground floor almost touch the ground. I assume the small structure on the roof is a stair access.


I bought three of these. They look a lot like large Soviet style, high rise apartment blocks. These apartment complexes are still very much around today throughout cities in China. Many of my in-laws live in such buildings. Like the previous buildings, there doesn't seem to be any doors. At first, I thought the two towers might be for elevators, but they have windows. I might make them into elevator shafts by covering over the windows. I'm not all that certain which is the front and which is the back.

They are very stylistic, and that is OK. I'm going to leave the windows they way they are rather than put clear plastic behind them, or maybe glue black paper behind them. I might buy some more, if I can find them on AliExpress again. UPDATE: Here is the link, and they cost about US$3.00 excluding shipping.

Thursday, March 29, 2018

A Busy Night at the Workbench

For the last two weeks, I've had this urge/need/desire to get as much done as possible. Is the Universe trying to warn me about something? Or, maybe its a subtle panic of old age coming on. I found out at a recent eye exam that I am starting to get cataracts. This could explain why I needed a stronger prescription of both reading glasses and distance glasses. I tried bifocals awhile ago and didn't like them. I have going back and forth between various projects.

Last night I completed a couple of things, which I happened to post on various Facebook groups.

3D Printed Fantasy Figures
Except for basing, I finished up my last two 15mm fantasy figures from the Shapeways shop, Small Ox Miniatures. They are 15mm versions of the sculptor's 30mm figures. I am glad I got them when I did because for some reason he recently pulled them from his shop. They are not as detailed as their larger versions, but still not bad. He printed them in some sort of black plastic that is has a very smooth finish. I wish more Shapeways sculptors used this material. First up is the High Elf Dragon Maiden:


Blue armor spoke to me when I saw her. I painted her armor silver and then brushed on a blue glaze. I then went back over some of the raised parts with a light dry-brushing of silver. I am not too happy with the highlighting of the face, however, this is a shot before I applied a coat of clear flat. When I put it on the face, the clear flat rubbed off most of the highlights! This is the first time that this has happened. I reapplied the highlights and I think it looked better.

Next Vampire Lord:


Sorry about the crappy picture. I usually manage better shots than this but I wanted to put it up on one of the Facebook groups and was in a rush to take it before my phone battery went dead. I think he turned out a little better than the Elf warrior. For the armor, I mixed black and a touch of blue with silver. Once dry, I lightly dry brushed it with silver. The face and hands were painted with a mixture of light flesh and gray, which was the same colors I used for that Necromancer I posted back in October. I gave everything a wash of Vallejo dark gray wash. I then went back over some of the skin with a diluted version of the original skin color. He and the Elf will be mounted on metal fender washers rather than my usual thin sheet steel bases. They are so light that they need a little more weight to keep them on the battle field.

1/600 Terrain
I also managed to finish off a bunch of trees and a little house for my Bovatopia campaign. I think the trees are a little more suited for 1/300. They are blobs of polymer clay stuck on some wooden rods that I bought at a craft store. In turn, they are mounted on washers with more clay globbed on to make the base. They are then flocked and sprayed to hold the flock in place. I probably spent more time on them than I planned.

The house was a test piece, proof of concept, so to speak. My goal is not to spend lots of time on 1/600 terrain...its quantity over quality here. The house is a block of balsa wood with a rod of styrene plastic for the chimney. Windows and doors painted on. The roof looks like crap, but again, don't care.

Another quick photo for the 1/300 Facebook group

I had planned on knocking out more little houses last night but I couldn't seem to find my mitre box.

Saturday, November 11, 2017

Rethinking Bridges

As much as I like the bridges I made for my 6mm moderns, they are limited by the fact that I can't put them anywhere. They are part of a river segment. So, what that means is that I have to lay down the roads to conform to where the bridges are. Originally, I wanted bridges that I can place anywhere, but I couldn't figure out how to integrate them with the river banks. At the same time, I didn't want them suspended a few scale feet above the water.

Schorote, a contributor on the Facebook 6mm wargaming and terrain group  (also has a website: BK (budget) Wargaming), has made bridges for his games. When I saw his pictures, it was one of those, "Doh! Why didn't I think of that?" moments. He kindly let me post them here:


According to Schorote, "the bridges are 6 cm long, 2 + 2 +2 cm, and 1,5 wide. the river top is 5mm below board surface while it is again 5mm deep."

A few years ago, I bought one of those profile or contour gauge. Now I have a use for it. My rivers are pretty uniform in width and the banks are not particularly variable. I think I can build some that will do the trick.

Monday, October 10, 2016

Even More Stone Walls

I seem to be obsessed with making walls. This is the latest of my wall making. I built a form out of thin cardstock. The form consisted of a strip of the cardstock of the height I wanted the wall to be glued onto another strip of cardstock that acted as a base. I then squished a ribbon of polymer clay onto one side, used a stamping tool that I made also out of polymer clay to make rock impressions, then baked it. I then did the other side the same way. The result is wall #2 in the picture below. I still need to give it a wash, which will make the impressions of stone stand out more.

1) made directly from model railroad ballast, 2) made from polymer clay, 3) made from mold of RR ballast
I showed off wall 1 in a previous post. Not to rehash the pro's and con's of it, but frankly it looks too much like the home of a caddisfly larva:

Maybe I should have caddisfly larvae make my walls? They seem to know what they are doing.
From: http://www.kindermagic.com

The cast I made using railroad ballast really looked nice ( Wall 3) and is what I was going after, but the two sides of the wall didn't fit well. I think I might try making more of the wall 2 method. It is less tedious than making wall 1, and I don't use up bottles of superglue gel, which have become pricey.  The cardstock form has the advantage of keeping the height of the wall a little more consistent and doesn't melt in the oven.

Thursday, September 22, 2016

Quick Pine Trees

In case you haven't figured it out, I like to scratch build things. I try my best not to buy pre-made stuff. OK, I haven't gotten to the point where I make my own flocking, but don't think I haven't thought about it! Even when I know that there will a lot less aggravation and work just to buy something, I still go do the path of most resistance.

Recently, however, I succumbed to  "cheating." I was at Michael's craft store, which is starting to put up all of their Christmas craft items. As I passed down an aisle, there was a display of tiny Christmas trees:


The size looked like it would fit 1/300, so I thought why not and bought two packages.

Last night, I forced myself to work on them (more on the "force" part later). This is what they look like straight out of the package:


There were in various states of squishiness, and many had long strands of branches sticking out in random places. Additionally, there were the bases that were cut wooden dowels. Fortunately, the trees were not glued in and could be easily removed. I popped off the bases and mounted them on a penny using epoxy putty:


Once the putty dried, I trimmed the odd branches. They actually don't look that bad as is, but I went ahead and painted the branches a pine green using craft paint. I then painted and flocked the base:


I decided not to flock the branches. I figured at that size, it would obscure them.

I won't be using them for my Gambusia campaign, but I have some ideas for some WW2 micro armor games where they could come in handy.


-------------------------------------------------------------------------------------------------------------------------
WARNING! If you are in a good mood and don't really want to hear about someone else's crap, read no further. 

So, why did I have to force myself to do engage in this little project? The past September, I've been in a major funk, low spot, dare I say depression. A big part of it is, is that I feel I have absolutely no control over my life both at home and at work. I don't want to go into the home life details, but I will with my work.  I used to be able to call my work a career, now it's just a paycheck. I promised myself a long time ago that I would not end up like my father, career-wise, but now it's feeling like I have. Yes, I am fully aware that I should be happy that I am employed, but I am starting to wonder why I wasted so many years in school (two bachelor's degrees, and master's, and a Ph.D.). It has even bled over to my hobby. Wargaming and miniatures have been a big part of my life since the 1970s. It got me through high school and has been my place to go for at least a few hours when things were tough. At the end of August, I sat in my chair at my workbench and really wondered what is the point of this? It seems like I will never get this campaign off the ground. BTW, I am feeling the same way about my research. Between that, and just being very tired at the end of the day all of the time, I just have had no desire to do anything. Last night was the first time I visited my workbench since the end of August. Last night, I just forced myself to work on these trees. I felt that here is one more thing that I bought and if I don't do anything with them now, they will just sit in a box somewhere. Fatigue be damned, I dragged my ass to my bench and started working on them. It was good therapy. No miracle happened, but at least its a start.

Saturday, August 20, 2016

More Stone Walls

I've been spending my last two weeks messing around with making more efficient stone walls. I made a mold and used various casting media, got varying results, none of which I was completely happy with. So, I went back to the slow, tedious method of building up the walls by repeated gluing layers of model railroad ballast. I was a little happier this time around than I was with the sheep pen. Here is another small farmstead. I am not quite done with it, but you get the general idea of things.

Here is looking down on it:


Here is a more street level view:


This time, I used a super glue gel, rather than the liquid type. I got much better control even if it dries slower. One thing learned for next time is to put in the gates first before laying down the walls. What I also plan to do with this one is to get is a coat of diluted white glue. Some stone pieces are more tenuously glued than others.  That will help hold the whole thing together better. The main thing that still eludes me is how to make the top of the walls level. The super glue gel helps with this, but its still far from perfect.

This project has sort of burned me out on terrain making. I've got one more terrain piece I need to make (a truck stop), but I really just want to start gaming.

Sunday, August 7, 2016

Sheep Pen

Ba-a-a-a!


I am trying to make some stone walls. They are proving to be very frustrating; it reminds me too much of making sandbags. This was made out of coarse model railroad ballast that I built up in layers. The walls did not come out even. That is OK for a sheep pen, but not if I want to make walls for a farm. Also, it is rather time consuming.

There are lots of tutorials out there for making stone walls for larger scales, but nothing I could really find for microscale.

Tuesday, July 12, 2016

Purchases From Chicagoland

Last week, I took the kiddies to visit my family in Chicago. My family actually lives in the suburbs, but unless you are from around there, you probably won't know the names of the towns. Anyway, I made my semi-annual trip to Games Plus Hobbies. I usually spend about an hour or so, wandering around, basking in the glow of all things gaming. I had not planned to but I ended up buying three items.

First, Team Yankee rules by Battlefront.


A lot of folks have been playing them using 6mm. I read through them a couple of time. I'm not exactly sure how they differ from Flames of War, but they seem easier to understand. I recall there were some things in FOW that I just didn't get, like artillery. Made more sense to me now. They only problem right now is that the weapon stats are for a few AFVs and such that were in NATO or Warsaw Pact. Hopefully they will expand it beyond that.

Next up is a game called Munchkin by Steve Jackson Games.


I've seen this for awhile. I thought I'd buy it and my daughter, nephews, and I could play it one night. That never happened.  Reading over the rules, it looks like a fun game, but it's hard to say until it gets played.

Finally, I bought some micro-scale banana trees. I don't remember who makes them.


They don't exactly look like banana trees, but they will due as some sort of palm tree. Looking at them, I can see how they were made. The makers of these took wire that is used to hang pictures up. It consists of a number of very fine wires that are twisted around each other like a cable. they unravelled them at one end at glued flocking to them. It seems, too, that they didn't bother spraying them with any sort of PVA glue to hold down the flock. There is flock coming off of some of the branches and the bases. Also, their bases are rather thick. I'll use them, but I'm not sure if they were worth the $12 I paid.

Wednesday, June 15, 2016

Bought the Farm(s)

I've had a little time at night to continue working on terrain pieces. This latest work has been on building farms. I scoured the web looking for what a typical non-Western farm looks like. In the US, Canada and Europe, there are typical farm buildings like a barn, but outside of these regions, all bets are off. I just decided to create what my own farms having gotten nowhere on the internet.

This is the one I finished last night:


I am particularly proud of the stairs. It took me almost as long to make those as the rest of the farm complex:


Here is one I made about a year ago:


I think my recent farm is a great improvement. It was a lot easier to use thin cardboard to make walls, and they look nicer, too. The polymer clay was very difficult to make them.

Why walled farms? Why not? I could probably also use them for walled parts of town.